Car Sort: Color Puzzle Level 419 Solution Walkthrough
Route Reference
Key opening, middle, and finish positions for this route.
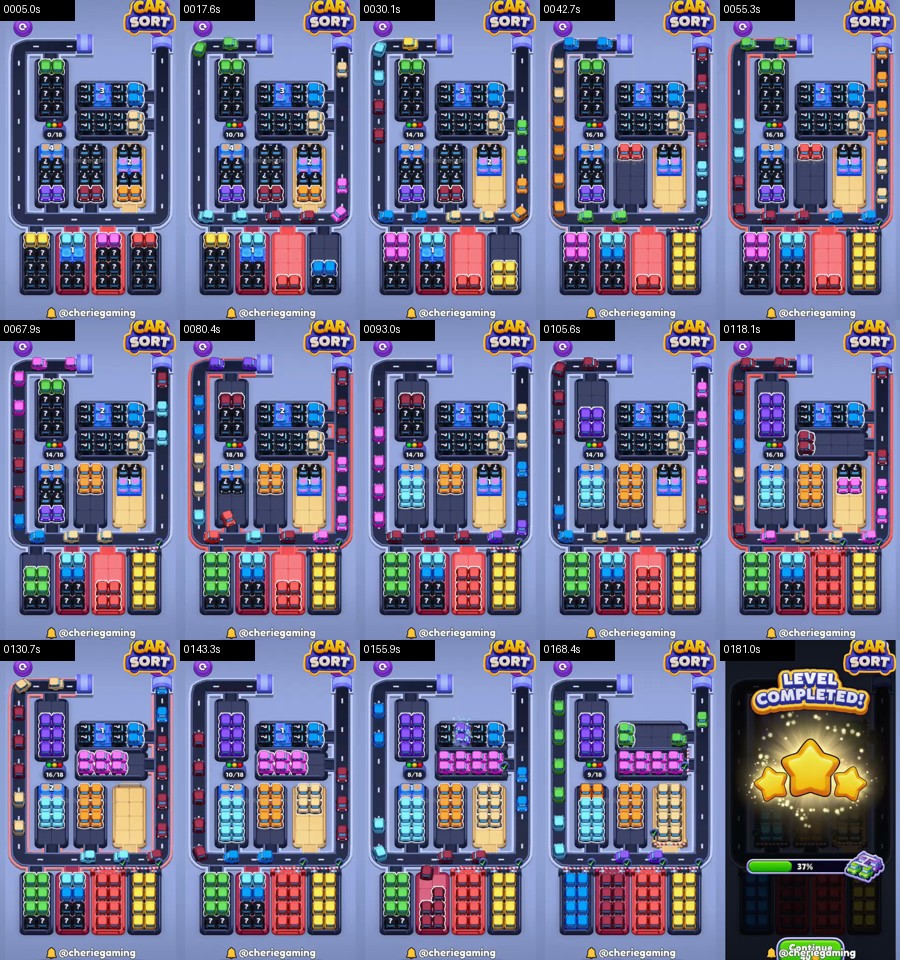
Read the L-block and lower feeders
The opening inner faces show dark blue, cyan, cream, and green on the top arm, with purple, red, orange, and yellow down the vertical leg. The four lower garages eventually reveal pink, cyan, red, yellow, green, blue, and burgundy. The pale platform blocks a large central area until nearby groups leave.
Use this route reference:
green upper-left → cyan top arm → cream top-right → blue inner row → red vertical face → orange vertical face → first numbered cover → purple center → pale platform release → pink lower feeder → cyan lower feeder → red and yellow bottom columns → green and blue late columns → burgundy cleanup
Finish the current arm of the L before changing direction. The top arm and vertical leg share the upper-right bend.
Open the top arm
Start with the complete green face at the upper-left side of the inner block. Cyan follows across the top arm. Cream then clears from the right end and leaves a continuous dark strip above the central covers.
Blue becomes the next safe inner row. Give it the full loop; blue cars use both the top-right and lower-right turns before reaching their destination. Do not open red until the blue markers vanish.
The opening checkpoint shows a dark top arm, an empty upper bend, and a complete red or orange face in the vertical leg. If the pale platform still hides most of the center, that is expected.
Work down the vertical leg
Red leaves first because it touches the outer road. Orange follows after red creates a dark vertical bay. These two groups lower the first numbered cover.
Purple appears behind the cover and should be cleared as one complete group. A small pink or cyan cell may become visible near the platform, but wait for the whole face. The road counter can change before the purple convoy fully disappears.
When purple is gone, the pale yellow platform begins to open. Keep the new space empty. It is the buffer needed when the lower feeder columns enter from below.
Bring in the lower columns in pairs
Pink is the first safe bottom feeder when its full face is visible. Clear it, then cyan. These colors enter near the lower-right corner and should never overlap.
Red and yellow form the next pair. Red takes priority if it owns the vertical road; yellow follows after the road becomes dark. Their deliveries fully remove the remaining cover around the pale platform.
Green and blue are the late pair. Clear the column closest to the active entrance first. If green is already on the road, complete green even when blue looks more exposed.
At the late checkpoint, the L-shaped inner block should have broad dark strips, the pale platform should be open, and only one or two lower columns should retain color.
Clear the final platform layers
Burgundy can appear behind the released platform or in a lower garage. It is usually the last long batch. Give it a completely empty loop. Cream or purple may return as short upper rows; clear them before burgundy only if they directly occupy the top arm.
The final playable state contains no number on either cover and no colored row crossing the pale platform. Send the remaining solid garage and wait until its markers leave the rounded rectangle.
Use the counter as a traffic gauge
The small road counter is especially helpful on this board because the rounded outer loop can look clear while cars are still turning behind the tall center leg. Early in the run, the count rises quickly as the green and cyan groups leave, then falls only after their matching garages accept the full batch. Do not treat the pale central bay as available until the counter has returned to the same low state shown before the next color starts.
The replay also gives a reliable positional check. Around the first minute, the right-hand red and orange faces have become dark while the lower bank remains mostly untouched. Later, the purple block sits high in the central opening and the pink horizontal row appears beneath it. If your lower yellow column is already moving at that point, you have advanced one phase too soon. Finish the purple or pink face, allow the right bend to empty, and only then resume the bottom pair sequence.
Near the finish, the tall cyan, orange, and cream-colored columns stand as separate complete faces. Keep that separation. Clearing the column whose exit is already exposed is safer than choosing the color with the most cars, because every lower group must merge into the same short bottom segment before it can use the long left curve.
Recovery on the rounded loop
A jam on the top arm points to green, cyan, cream, or blue. Finish that inner row. A jam along the vertical leg points to red, orange, purple, or burgundy. A blockage at the bottom belongs to one of the four lower feeders.
If a numbered cover refuses to move, complete the visible row immediately beside it. Do not tap a lower color in hope of changing the counter. The first cover depends on the L-block; the lower columns matter only after the platform begins opening.
When pink and cyan mix at the lower-right turn, stop tapping and let the leading color clear. Finish its source, then send the other. Adding yellow fills the long outer curve and removes the remaining recovery space.
If the platform is open but a central color remains stranded, use the nearest complete inner face before another feeder. The platform's dark area is a buffer, not proof that every central layer is finished.
On a retry, keep three visual checks: the top arm must be dark before red, the vertical leg must be dark before the lower feeders, and the road must be empty before every paired handoff. Level 419 then follows a clean release chain: green-cyan-cream-blue clear the arm; red-orange-purple open the center; pink-cyan-red-yellow work through the lower garages; and green-blue-burgundy complete the unlocked platform layers.