Car Sort: Color Puzzle Level 422 Solution Walkthrough
Route Reference
Key opening, middle, and finish positions for this route.
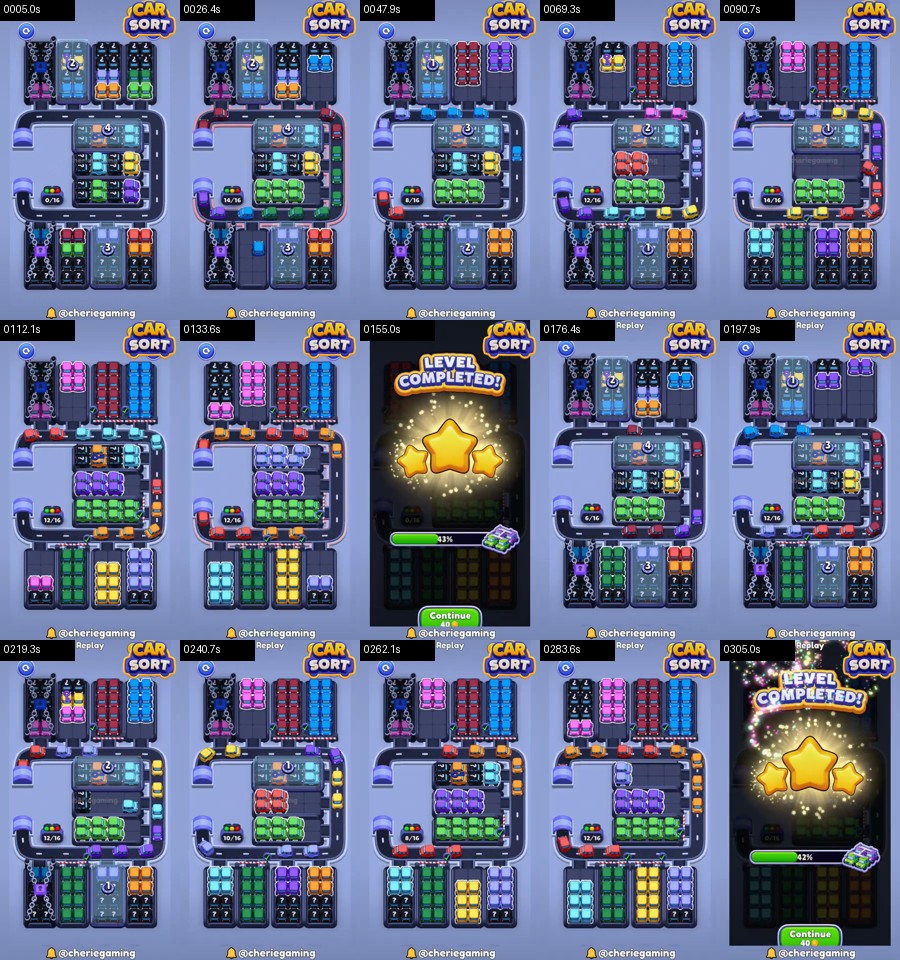
Read the platform sequence
The upper feeders begin with dark blue, yellow, purple, red, and cyan behind chains. The central block exposes cyan, yellow, green, and blue around the first platform. The lower feeders hold green, cyan, orange, purple, and pale blue behind larger covers.
Use this route reference:
cyan central pair → yellow center → green broad row → red center release → first platform opens → pink and blue middle rows → purple central band → upper pink-red-blue feeders → second platform opens → lower green and cyan columns → orange and purple lower groups → third platform release → pale blue, yellow, and red cleanup
Do not chase a newly exposed cell. Wait for a whole horizontal or vertical face to become available.
Open the first central platform
Start with cyan from the complete central face. Yellow follows after cyan clears the right turn. Green then leaves as a broader lower row. Red is the last opening color and should be completed without interruption.
These deliveries reduce the first platform. Keep the upper and lower chained feeders closed during this phase. Outside groups have longer routes and can block a central car at any corner.
The first checkpoint is an open center bay, dark cyan-yellow-green-red strips, and no marker on the square road.
Work through the middle colors
Pink becomes visible behind the first platform. Clear it, then blue from the adjacent row. Purple follows as the broad middle band. Each color should have the entire square to itself.
The upper chains begin opening during this sweep. Do not start the roof immediately. Finish purple and let the central counter settle. The first dark platform bay must remain empty for the roof convoys.
If red appears again beside purple, take the complete face closest to the road before switching zones.
Clear the upper chained feeders
Pink is usually the first full roof stack. Red follows, then blue or cyan according to the exposed entrance. Purple or yellow may remain covered until these tall groups finish.
Work from the feeder nearest the active corner. A long top convoy can wrap around three sides of the square, so wait until its markers disappear. These deliveries open the second platform and reveal the lower columns.
At the second checkpoint, the top bank is mostly dark, the central block has open platform bays, and one complete green or cyan lower column is visible.
Process the lower columns
Green should leave first if it owns the lower-left entrance. Cyan follows through the empty bottom edge. Orange then clears from the next complete column, with purple after it.
The lower feeders are taller than the central rows. Never overlap them. Use each dark column as proof that the entire batch has finished before moving to its neighbor.
These groups reduce the third platform. Pale blue or yellow appears behind it. Wait for the platform animation and choose the complete nearest face.
Final platform and cleanup
Clear pale blue through the right edge, then yellow. Red is a common final central row and should receive an empty square. A remaining purple or cyan feeder can finish afterward if its face is complete.
The final board should show all three platform numbers gone, upper and lower chains open, and broad dark lanes through the center. One isolated outside column may remain; send it alone.
Read the chained banks after each release
The upper and lower banks change in large, easy-to-check blocks. In the opening, the top bank still contains chained black faces while the center shows cyan, yellow, and green around the numbered platform. After those central colors clear, complete pink, burgundy, and blue columns appear above the loop. Do not select a chained fragment at either end; take only the tall face whose full colored length is visible.
The lower bank becomes reliable after the second platform retracts. A long green column stands left of the remaining numbered cover, with yellow or orange and pale violet grouped to the right. Clear green while the bottom-left curve is empty, then use the next fully uncovered column. The replay shows that the green row inside the square remains parked while a roof convoy is moving, which is a useful reminder that visible does not always mean ready.
At the final handoff, purple sits horizontally in the middle and the lower green group is still broad. Finish whichever group is already touching the road, then wait for the platform number to fall. The late pale-violet and yellow faces need the entire bottom and right edges, so they should never be used to fill a temporary gap in the central sequence.
Recovery between platform phases
A jam beside the center belongs to cyan, yellow, green, red, pink, blue, or purple from the active platform. A top-edge jam belongs to an upper chained feeder. A bottom-edge jam belongs to green, cyan, orange, purple, or pale blue below.
If a platform number does not change, inspect the colored face directly surrounding it. One local batch is incomplete. Sending an outside color from a later phase will not compensate.
When a roof convoy overlaps a central row, finish the convoy already occupying the active corner. Preserve the dark platform bay; do not add a lower group. If the leading destination is covered, restart and delay the roof until purple is dark.
A lower-column mistake is recoverable by finishing that column immediately after the current central markers clear. Never open a second lower column as a rescue. The square road has length, but its single-direction merges still require one batch.
Level 422 is long but orderly: cyan-yellow-green-red open the first platform; pink-blue-purple clear the middle; the upper feeders release the second platform; green-cyan-orange-purple clear the lower columns; and pale blue-yellow-red finish the third. Pause at every number change and the many chains become useful progress markers rather than distractions.