Car Sort: Color Puzzle Level 255 Solution Walkthrough
Route Reference
Key opening, middle, and finish positions for this route.
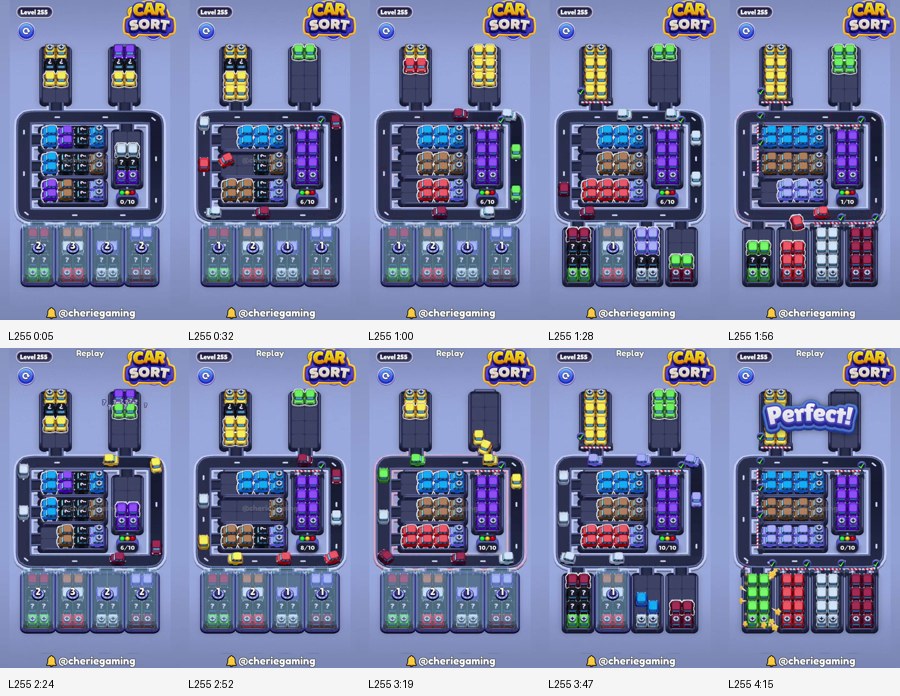
Opening layout
Four horizontal rows fill the inner garage. Blue is prominent at the upper left, purple forms a tall block on the right, brown occupies the middle, and red sits below. Several dark cars and a pale violet group remain behind them. The upper towers contain yellow plus later red or green cars.
Below the road, four columns display screw icons and numbered requirements. Their eventual colors include green, red, white, cyan, and dark red. They share one narrow bottom entrance, so releasing several columns together creates a severe traffic conflict.
The counter holds ten cars. Keep at least two spaces unused before a screw reaches its final count. A newly released column can expose more than one useful car.
Recommended color priority
Use this order:
blue → purple → brown → red → pale violet → yellow → green → white → cyan → remaining dark colors
Blue opens the upper-left interior lane. Purple clears the tall right-side block. Brown and red then empty the middle shelves. Pale violet becomes available across the lower interior after those blockers leave.
Yellow and green connect the upper towers to the lower screw phase. White and cyan should remain late because most of their cars are supplied from released bottom columns.
Clearing the compact center
Start with blue cars at the exposed left ends of the upper rows. Complete blue as one group and keep the top-left bend clear. A yellow tower car should not descend while blue is still traveling.
Purple is the strongest second target. Its cars form a concentrated right-side column, and removing them opens the vertical road beside the central garage. If one purple car remains behind a dark blocker, finish brown first rather than collecting unrelated colors.
Brown occupies the middle and can travel once purple is gone. Bring the exposed brown cars together without tapping red between them. Brown's removal reveals a clean red band below.
Complete red next using the central row and any exposed upper match. Do not rely on the lower screwed red column until its counter has naturally advanced. The visible center should provide most of the group.
The first checkpoint is a center arranged into clean blue, brown, and red groups with the right purple block removed or nearly finished. The road should be open on both sides.
Pale violet and the tower transition
Pale violet appears in the lowest central row after red clears. It uses the right bend, so finish it before sending a long yellow group from above. This creates an empty interior shelf and reduces the number of active colors.
The left upper tower supplies yellow. Move yellow only after the upper road is clear, then take the full group in sequence. The right tower supplies green after earlier colors leave. Complete green through the same road rather than mixing it with yellow.
If a tower still shows a different front color, leave it parked. The tower should provide the last pieces for an active group, not introduce a new pair.
The replay's middle states show blue, brown, red, and pale violet arranged as uniform central rows while yellow and green towers shorten. That is the stable shape to reproduce.
Releasing the four screwed columns
Each bottom column should be treated as a separate mini-puzzle. Open the column whose front color matches a group already visible. Move its cars through the bottom entrance, complete that color, and clear the entrance before touching the next screw.
Green may be the first useful lower match because it connects to the upper-right tower. Red can follow if the central red group is waiting. White and cyan should be late; their concentrated lower columns become easy once the road is empty.
Do not pull a car from every released column. Four partial colors consume the ten-space counter and block the bottom road. One completed column is worth more than four promising pairs.
When a screw counter is nearly zero, reserve space. Finish the active color before the release if possible. If the new car does not match, leave it in the column until the current route is complete.
Final cleanup
White and cyan use the newly emptied center efficiently. Complete white from its lower column, then cyan from the neighboring source. Their exits share the bottom bend, so they must not travel together.
Dark red and other dark cars are distributed behind brighter groups. Save them for last. Once the central shelves and towers are clear, their matching pieces can circle the road without meeting another color.
The final board should contain uniform vertical columns below and clean horizontal rows inside the loop. Exact destination positions can differ, but no road segment should hold mixed waiting cars.
Recovery advice
If the bottom entrance is blocked, stop opening screws and finish the color already sitting there. Look for its match in the center or upper towers.
If the top bend is jammed, complete blue, yellow, or green according to the waiting car. Do not start the other tower.
If the counter contains several pairs, prioritize the pair with visible matches in the central horizontal rows. Never guess that a closed lower column contains the missing cars.
If purple remains trapped on the right, clear the brown or red row blocking its exit. Moving more purple onto the road will not solve the physical obstruction.
If a restart is necessary, use four checkpoints: blue opens the left; purple opens the right; brown, red, and pale violet empty the center; yellow and green prepare the screwed columns; then white, cyan, and dark colors finish below.
The Level 255 solution is built around one-at-a-time releases. Clear the compact center before depending on screwed cars, use the towers as finishing supplies, and keep the bottom entrance dedicated to a single color. That rhythm prevents the ten-slot counter from becoming the real blocker.