Car Sort: Color Puzzle Level 256 Solution Walkthrough
Route Reference
Key opening, middle, and finish positions for this route.
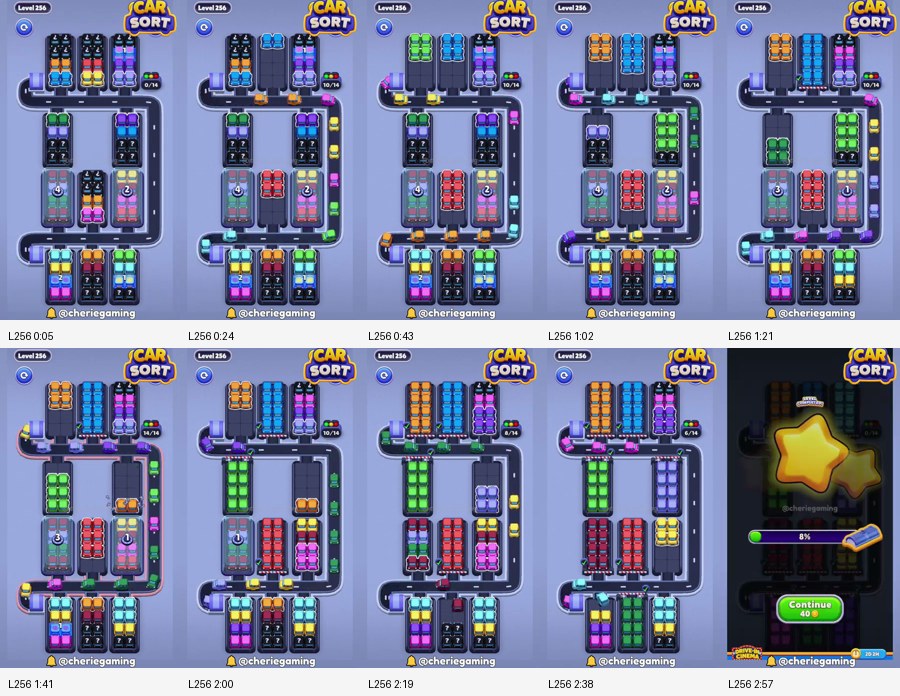
Three zones of the board
The upper stacks contain orange, cyan, purple, pink, white, green, yellow, and dark cars. The central area has left and right covered towers plus a visible red column in the middle. The lower stacks contain blue, yellow, red, green, cyan, and additional hidden cars.
The road forms a tall squared loop. Its right edge is long but narrow, while the left edge is interrupted by two inward hooks. Cars from different zones can easily meet at those hooks and stop one another.
The counter holds fourteen cars. Use that capacity to complete a tall column, but avoid opening partial groups from all three zones simultaneously.
Safe route order
A practical order is:
cyan → purple → orange → green → red → pink → yellow → blue → pale violet → lower dark groups
Cyan and purple shorten the upper stacks and free the top road. Orange then leaves from the upper-left. Green connects an upper stack with the central right tower. Red clears the visible central column.
Pink and yellow bridge into the bottom phase. Blue is strongest after the lower-left hook is open. Pale violet and the covered dark groups belong to the final release.
Opening the upper road
Begin with cyan from the upper stacks. Move a complete cyan group around the top without mixing orange or purple into its path. Cyan's removal opens the middle upper exit.
Purple follows from the rightmost upper stack. It shares the top road with pink, so finish purple before exposing too much pink. A completed purple group also frees access to the right vertical lane.
Orange can now leave from the upper-left stack. Its route turns through the short left hook. Keep that hook empty until all orange cars have passed.
Green is the final upper transition. Some green cars sit above, while others appear in the central right tower. Wait until both sources are accessible, then combine them. Pulling only the upper green pair too early wastes counter space.
The first checkpoint is a top zone containing clean orange, cyan, and purple groups or empty stacks, with the right lane available for central traffic.
Central tower sequence
The red tower in the middle is visible early but should not move until the upper lane is stable. Once it has a clear exit, complete red in a single run. This creates space between the covered towers.
The left and right towers show counters. As their covers advance, inspect the front colors. Take a revealed car only when it matches green, pink, yellow, or another active group.
Pink usually becomes the next useful color. It appears in the upper-right progression and lower stacks. Complete it before yellow if the right road is open. Otherwise finish yellow from the lower-left and upper stacks first.
Never park a car directly above a covered tower. Each release needs room to turn onto the outer loop. The central vertical lanes are transition points, not storage.
Entering the lower section
The lower stacks feed the road through a tight left bend. Clear yellow or blue as the first lower task, depending on which group is fully exposed. Do not alternate them.
Blue occupies a concentrated lower-left stack and can leave quickly after yellow moves. Cyan may reappear on the lower right; if the earlier cyan group is already complete, treat this as a separate full set rather than holding isolated cyan cars across the whole level.
Green and red also recur below. Match them with newly released central cars only when a full group is ready. The counter is large enough for one tall group but not for four incomplete repeats.
The replay's late state shows long uniform orange, cyan, and purple columns above, green and red in the center, and organized colored columns below. This confirms that zone-by-zone consolidation is more important than exact garage placement.
Screw counters and cover timing
Numbered covers decrease as completed cars leave. Before a counter reaches its final step, preserve three spaces. A tower may expose two colors in quick succession.
If the first revealed car matches the active color, use it immediately. If it begins a new color, leave it and complete the current group. Emptying a cover indiscriminately clogs the central road.
The left cover influences traffic through the middle-left hook. The right cover feeds the long outer lane. Release the left only when the lower bend is free, and release the right only when upper traffic has finished.
Pale violet is a typical late covered color. It becomes easy after red and green clear the center. Dark cars also become manageable only when their bright blockers are gone.
Recovery guidance
If cars meet on the right edge, finish the color with the shorter remaining source. A complete group will remove one line of traffic; starting another color will not.
If the lower-left hook is blocked, stop using upper stacks and finish yellow, blue, or pink from below.
If a central cover opens into a full counter, leave the new car in place and complete red or green from visible towers.
If upper stacks remain mixed late, clear the exposed color with a complete vertical run. Do not reach into the bottom for a different group.
If too many recurring colors are active, distinguish the current group by location. Finish the upper cyan group before starting the lower cyan group, and apply the same rule to green or red.
On restart, use the zones: cyan, purple, orange, and green simplify the top; red and pink resolve the center; yellow and blue open the bottom; then pale violet and dark covered cars complete the board.
Level 256 is a routing puzzle more than a matching puzzle. Keep each hook available for its current zone, let the cover counters advance through completed groups, and avoid mixing repeated colors from distant stacks. The tall board then empties in a clear top-to-bottom progression.