Car Sort: Color Puzzle Level 293 Solution Walkthrough
Route Reference
Key opening, middle, and finish positions for this route.
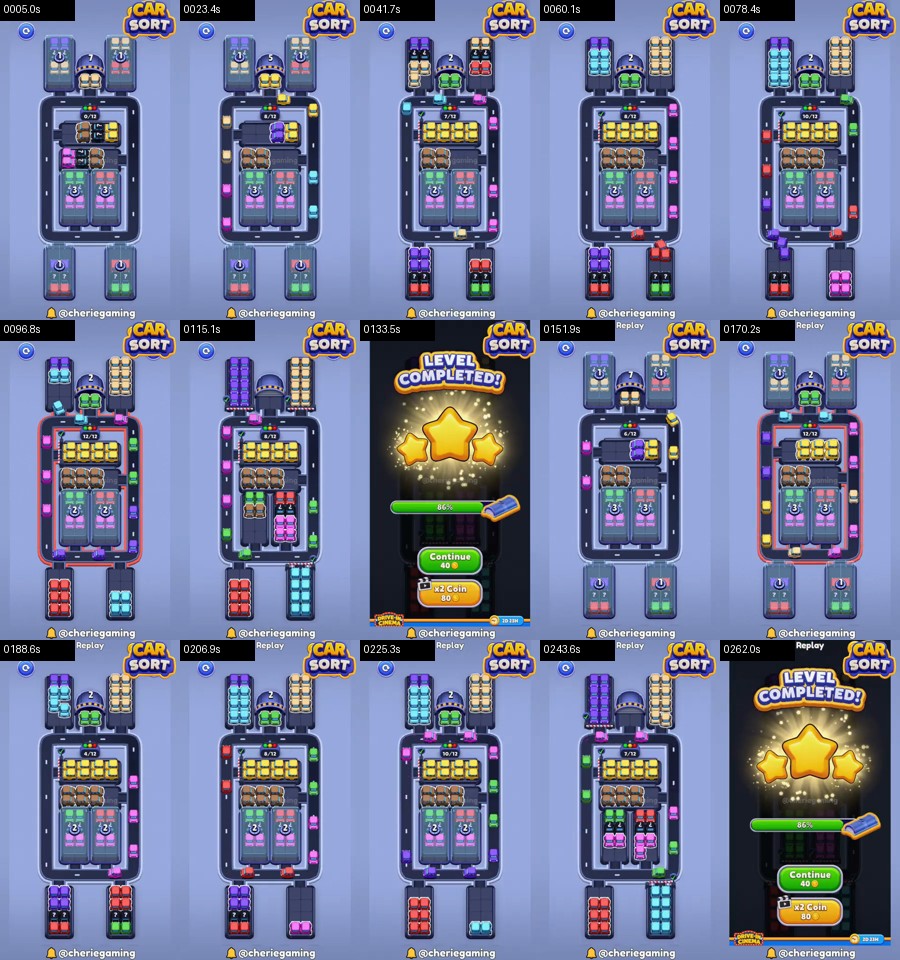
Two lifts divide the board
Both pink lifts begin with a visible count of 3. They split the center into left and right lanes, leaving only a narrow strip around their outside edges. The yellow bar above them is the first broad blocker; the brown bar underneath becomes the second. Small purple, orange, green, red, and blue groups around those bars are supports, not separate opening targets.
Follow this phase order:
yellow center bar → brown center bar → pink lift traffic → green supports → purple left tower → beige right tower → lower red and cyan reserves
The goal is to reach a checkpoint where the yellow and brown rows are complete and both lift counts have fallen. At that point the outer loop can handle the taller columns safely.
Flatten the middle first
Start with the accessible yellow cars around the upper middle. Complete their batch instead of mixing in the nearby orange pair. Removing yellow creates a full horizontal gap across the board and gives cars from either side a way to reach the upper garages.
Brown comes next from the row directly below. Brown needs the opening that yellow just created. Once it clears, the two pink lifts are no longer boxed in by two solid color bands. Work the pink cars released beside those lifts, allowing their counters to step down before reaching into a covered lower garage.
Green is the bridge between the center and the outer loop. Clear the exposed green cars after pink has moved. This creates side space without taking over the narrow road needed by the remaining lift traffic.
Do not start the tall purple or beige columns while a yellow, brown, or pink car is still waiting beside a lift. Those columns send long batches around the same rectangle and leave very little recovery space.
Tower swap and reserve garages
Purple is the first safe tower color, entering from the upper-left side after the center is flat. Finish it, then use the opposite side for the pale beige column. The two towers should not overlap on the road. Their clean separation is visible in the replay when one side is already empty before the other column begins moving.
The bottom garages reveal red and pale cyan as late reserve batches. Red uses the open left/bottom edge; cyan uses the space created on the other side. By now the lift counts and center bars should no longer control the route, so these groups are straightforward full-column clears.
If one lift remains at 2 or 3, finish the center color beside it before opening a reserve garage. If the loop is full of mixed colors, stop at the nearest garage and complete its matching batch. A covered lower garage should never be treated as extra parking; opening it early adds another long queue to a board that has no spare lane.
Read the center as two gates
The upper yellow bar and lower brown bar act like two gates across the same crossing. Removing only a few yellow cars does not help because brown still prevents the lifts from connecting to the bottom edge. The useful change occurs when the complete yellow band is gone. Cars can then travel above the two pink lift blocks without being forced into the outer corners.
Brown needs that newly opened strip. Clear it from one side to the other and keep the nearby orange supports parked until the brown batch has finished. Once both horizontal bands have disappeared, the board has a recognizable window through its middle. That empty window is the safest signal to begin the lift-related pink traffic.
The left and right lift counts do not always fall on the exact same tap, but they should remain in the same phase. If the left marker has changed while the right remains covered by center cars, work the visible pink or green group near the right marker. Do not compensate by opening a bottom reserve; that only creates another queue around the rectangle.
Route the square in controlled laps
- Complete yellow across the upper-middle band. Keep orange and purple off the road until the full yellow group is accepted.
- Clear brown from the lower band. Brown uses the horizontal space yellow created and should leave the center flat.
- Move the pink cars connected to the two lift blocks. Treat the visible counter change as confirmation that the center release worked.
- Clear green from the exposed side supports. Green widens the outside lane without committing either tall tower.
- Drain the purple tower from the upper-left side. Let the last purple car park before beginning the opposite column.
- Send the pale beige tower around the right side of the rectangle. Its long line is safe because purple no longer occupies either upper corner.
- Open the lower red reserve and clear red along the left and bottom edges.
- Finish pale cyan from the other lower garage. With the center empty, cyan has a clean lap to its destination.
- Resolve any short orange, blue, or pink support group that remains beside an active garage face.
This order matters more than the direction in which the first car turns. The board has just enough road capacity for one tower-sized group plus a few parked cars. It does not have enough capacity for purple and beige to circulate together.
If your replay state is different
When the outer loop is full but neither tower is complete, first examine the center. A leftover yellow or brown car means the crossing was never truly opened. Finish that color before moving any more tower cars. If the center is empty, use the nearest active garage face to decide whether purple or beige should finish first.
If a lift remains at 3, return to the pink cars immediately beside it. If it has dropped to 2 or 1, look for the next exposed support color around the center rather than reaching into the lower reserve. The counters reward completing the local sequence; they are not timers that fall by themselves.
Opening a lower garage too soon is recoverable as long as only one reserve color has entered the road. Stop all tower taps and finish that reserve on the bottom edge. Once it parks, restore the intended center-to-tower order. If both red and cyan reserves were opened together, complete whichever color is closer to its garage, then keep the other stationary until the loop has room again.
The final board should simplify in layers: first no yellow or brown across the middle, then no traffic beside the lifts, then one empty tower side, and finally an open rectangle for the two reserve colors. Use those shapes as checkpoints instead of trying to copy every tap at full speed.
Level 293 is won by turning a layered center into an empty crossing. Yellow and brown flatten the middle, pink and green release the lifts, and only then do purple, beige, red, and cyan use the full rectangular loop.