Car Sort: Color Puzzle Level 402 Solution Walkthrough
Route Reference
Key opening, middle, and finish positions for this route.
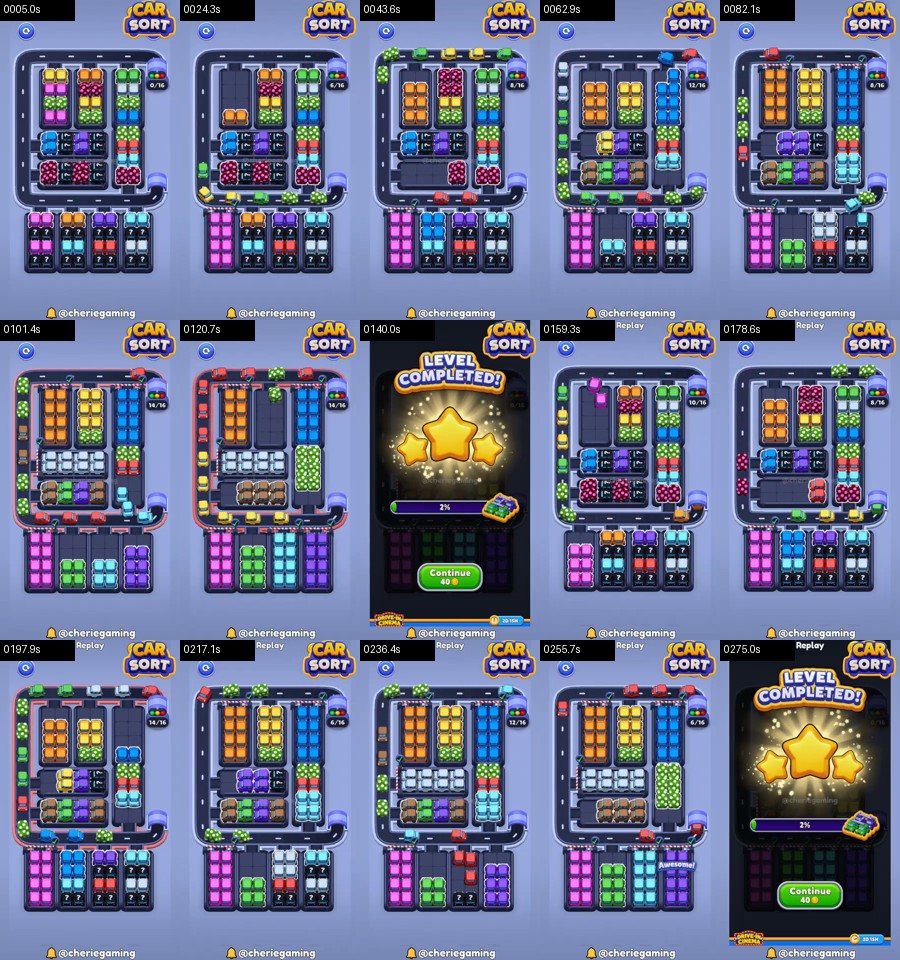
Read the packed central garage
The opening board has three tall upper stacks, two narrow horizontal bands across the middle, and red-pink groups along the bottom of the central block. Yellow and orange are visible near the top, with green and cyan beside them. Blue and purple form the first obvious middle pair. On the right edge, a red-green-white column sits beside the only curved exit. Beneath the road, pink is already available while green, cyan, purple, and other columns remain behind numbered covers.
Use this route reference:
blue middle row → purple middle row → red and pink lower bands → yellow upper face → orange upper face → green and cyan towers → right-side red/green/white → brown-purple center strip → first white release → bottom pink → newly opened green and cyan → final purple and warm-color cleanup
The color order may appear to offer several choices at once, especially after a counter changes. Always choose the complete face that touches an empty road entrance. A color still hidden behind a numbered bottom cover is not part of the current batch, even if the same color is moving around the loop.
Open a horizontal lane before touching the towers
Begin with the blue group across the middle-left. It has a direct path to the road and clears a useful horizontal slot. Let every blue marker pass the lower-right curve before releasing purple from the adjacent row. Purple uses the same exit, so changing too early leaves one color waiting behind the other.
When both middle rows are dark, continue with the complete red and pink faces immediately below them. The replay shows the central block shrinking from the inside outward: the horizontal bands disappear first, while the three upper towers remain intact. That is an important checkpoint. If an upper yellow or green car is already circulating while blue or purple remains visible, the opening has been mixed and should be repaired before progressing.
Finish the active red group, wait for the road to empty, and then clear pink. The space created by these four batches gives the tall columns enough room to feed toward the exit without trapping a final car in the center.
Drain the three upper towers separately
Yellow is the first safe upper face once the middle has opened. Move all visible yellow cars as one batch. Orange follows from the neighboring tower only after the yellow markers have crossed the bottom edge and disappeared. Orange occupies a longer vertical face, so keep tapping that source until the whole exposed section turns dark.
Green and cyan form the next tall pair. Clear the green face that is closest to the open central lane, then take cyan from the far-right tower. The large blue column that appears later should not be confused with the opening blue band; it is a deeper layer and needs a fresh, empty road.
At this stage, use the board rather than memorizing a rigid tap count. A safe checkpoint has orange, yellow, and one cool-color tower drained, a broad dark area through the left-center, and only one color moving on the perimeter. If the numbered badge near the right side drops but a road marker remains, wait. The counter change confirms progress, not permission to start the next batch immediately.
Release the right wall and lower covers
The narrow right-side column contains red, green, white, and cyan faces stacked close to the exit. Work down that wall in the order each full face becomes exposed. Red usually leads, followed by green; white and cyan come later after the center has cleared. These batches enter the road quickly, so an unfinished car can be hard to notice at the lower-right curve. Check the bottom edge before switching.
The lower covered garages now begin to open. Pink is the useful first outside column. Clear it as a complete vertical batch because it creates room beneath the loop and helps reduce the remaining cover counts. Do not wake both cyan and purple merely because their covers are visible. Open one column, complete it, and make sure the road has returned to a single-color state.
The central brown-purple strip becomes available around the same transition. Brown should leave before purple when brown occupies the row closest to the exit. Its departure exposes another full face rather than a scattered pair. Clear that face, then take purple through the empty lower bend.
Turn the late board into four clean columns
After the tall central stacks have been reduced, the board is easier to read. The remaining substantial groups are concentrated in the outside columns below the road and a few vertical faces on the right. Move green from the first fully opened bottom garage, then cyan from the next one. White should be cleared whenever it forms a complete horizontal block inside the center; leaving it in place narrows the only approach to the exit.
Purple is best saved until its bottom column is fully uncovered. A partial purple release can circle for a long time while its final cars remain locked, filling the perimeter with traffic that cannot finish. Once the cover is gone, drain the whole purple garage without interruption.
The late checkpoint in the replay shows the main central block reduced to orange, yellow, blue, white, and brown faces, while the bottom garages have become clean green, cyan, and purple columns. Clear whichever complete color is attached to the open lower-right entrance, then return to the next exposed central face. This alternating rhythm prevents an outside column from colliding with a central row.
Final cleanup around the square
Near the finish, orange and yellow occupy tall inner faces, blue forms a remaining right-hand column, and white or brown may span a lower row. Complete the vertical face that already feeds the road. Wait for its final marker to pass the top-right corner, then take the horizontal group below it.
Do not combine repeated colors from different places. An early green group and a late green bottom column have separate sources and may unlock at different times. The same warning applies to cyan, purple, red, and pink. A matching color elsewhere is safe only when the current source has become dark and no marker of that color remains on the road.
The final substantial sweep usually consists of white, brown, and one warm-color column. White clears the broad center row; brown removes the block beneath it; orange or yellow then has an unobstructed route around all four sides. Let the last group finish before expecting the completion screen, because the final car may still be traveling behind the dark central garage.
Recover a mixed or stalled route
If traffic stops beside the lower-right entrance, find the incomplete face directly inside that corner. It is normally part of the right-side red-green-white-cyan wall or the active middle strip. Finish that source rather than opening a bottom garage.
A jam along the bottom edge usually means a covered outside column was started too early. Stop tapping new colors and complete the visible source whose markers already occupy the road. If its remaining cars are still covered, first finish the complete central group tied to the nearby counter. That release often exposes the missing cars and lets the stalled batch end.
When the top edge is crowded, inspect the yellow, orange, green, cyan, or blue tower that began the current lap. One car hidden at the bottom of a tall face can keep the entire perimeter occupied. Clearing unrelated pink or purple will only create a second queue.
If your board no longer matches the route reference, rebuild order from dark space. Identify the largest empty horizontal lane, locate the complete garage face touching it, and finish that color alone. After the road resets, return to the highest exposed counter. A restart is only necessary when two partial colors are stationary at opposite corners and both of their remaining sources are still locked.
Level 402 becomes manageable once the center is treated as a sequence of lanes rather than one large garage. Blue, purple, red, and pink carve out the opening; yellow, orange, green, and cyan remove the upper towers; the right wall and brown-purple strip unlock the lower columns; then the fully opened green, cyan, purple, white, and warm-color groups complete the board. Keep the lower-right entrance empty between batches and the square road provides enough space for every final delivery.