Car Sort: Color Puzzle Level 209 Solution Walkthrough
Route Reference
Key opening, middle, and finish positions for this route.
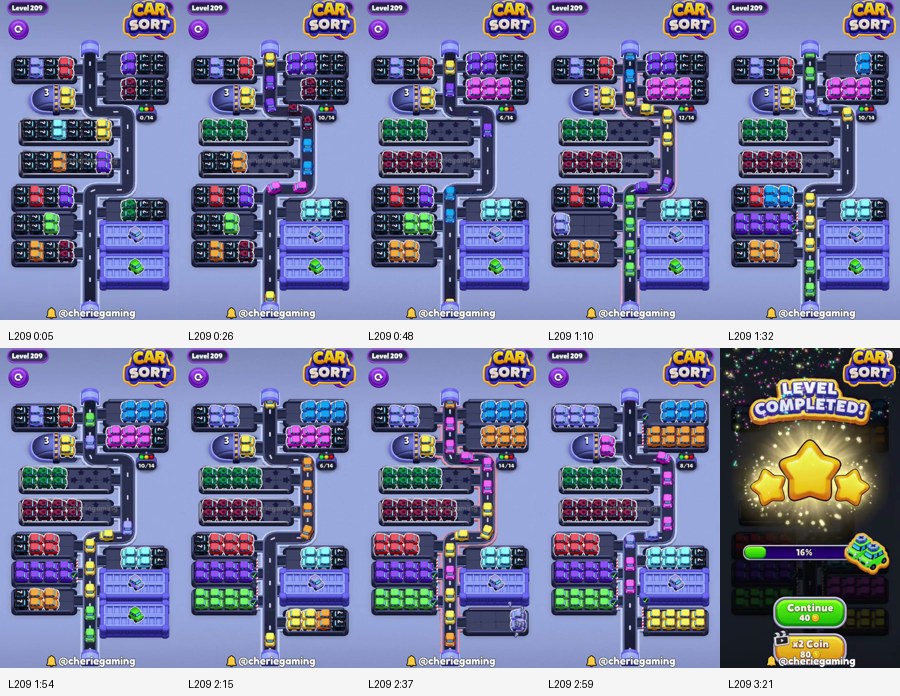
Follow The Snake Road, Not The Nearest Shelf
Car Sort: Color Puzzle Level 209 uses a long S-shaped road that winds between several disconnected-looking parking groups. A small counter and compact shelves sit at the upper left, a purple-and-pink block occupies the upper right, three long horizontal shelves fill the middle, and another set of short rows waits at the lower left. The bottom-right corner contains a cyan garage beside three large covered bays. Every one of these areas feeds the same narrow road, so the route has almost no safe place for mixed-color traffic.
The opening screen is intentionally messy. Many rows expose only two or three colored cars while the rest remain black-backed. The upper-right purple cars look like the clearest batch, but the middle road still has small yellow, green, and red blockers on its bends. The lower covered bays also display tappable markers even though their approach is not yet clear. The solution is to work along the road in travel order, clearing the cars nearest a bend before asking a deeper shelf to feed that bend.
Use this area order as the Level 209 route reference:
upper-left yellow checkpoint -> upper-right purple/pink -> green upper-middle shelf -> dark-red middle shelf -> exposed lower-left rows -> cyan bottom-right garage -> covered bays one layer at a time -> orange, purple, green, and yellow cleanup
Within an area, keep same-color cars together. A newly revealed color may need to wait until the earlier batch reaches its garage. The visible checkpoints show the board gradually changing from scattered pairs into full horizontal color bands; those bands should then be removed one at a time rather than mixed on the road.
The road itself provides the best progress test. At the opening, several corners contain cars and the center counter is still full. By the first major checkpoint, the upper-right block has consolidated into purple and pink rows while green and dark red become clear across the middle. Later, the lower-left area forms distinct red, purple, and orange bands, and the bottom-right cyan garage has an open approach. If your board has those color bands but the road between them is crowded, stop revealing covers and complete the color already travelling.
Unlock The Upper Hook And First Three Shelves
Begin at the upper hook of the S-road. The small yellow group beside the counter is a useful checkpoint because it occupies the short turn between the upper-left shelves and the rest of the board. Clear the exposed cars that can reach their garage directly, then allow the counter to settle. Do not immediately open every black-backed row around it; the purpose of the first move is to free the turn, not to expose the entire upper-left block.
With that hook usable, move to the purple and pink cars at the upper right. Purple should be handled as one compact group. It sits close to the upper road and clearing it creates space for the adjacent pink row to expand. Pink follows after the purple traffic has left the top bend. Alternating purple and pink taps can leave both colors queued along the same short horizontal segment, preventing the next middle shelf from entering.
The three middle shelves should then be approached from top to bottom:
- Clear the exposed green row on the upper-middle shelf. Green is closest to the already opened upper road and creates a long empty strip across the board.
- Move the dark-red or burgundy middle band. This row uses the space left by green. Keep it together until the central bend is empty.
- Release the next visible lower-middle color only after the road settles. Depending on the counter state, this may be red, blue, purple, or an orange group revealed from a neighbouring stack.
- Ignore the large lower-right covers for now. Their cars must cross the same lower bend that the middle shelves are using.
The important detail is that empty shelf space is not a parking buffer. Once green disappears, leave that strip empty while the dark-red cars travel. Filling it by opening another covered row does not create a shortcut; it only sends another color to the S-road.
If the upper-right block remains crowded after green begins moving, return to the unfinished purple or pink batch. A car held near the top vertical segment usually means its matching garage has not received a complete group. Finish that color before touching a middle cover. This recovery keeps the jam above the center instead of allowing it to spread to the lower half.
Use The Lower Bend As A Checkpoint
The lower-left parking block contains several short shelves stacked beside the longest bend in the road. Early in the solution, these rows show scattered red, purple, green, and orange ends. Later checkpoints show them consolidated into full bands. That consolidation is a signal that the upper and middle work has exposed the right order; it is not a signal to tap every band together.
Start with the highest lower-left row that has a direct opening to the road. Red commonly becomes the first clean batch here, followed by purple or orange. Finish one band, watch its cars travel down and around the central spine, and wait until the lower vertical lane is empty. Then take the next exposed band. Green is safer after the rows above it have moved because green often occupies a deeper shelf and needs the entire bend to exit.
The cyan block at the bottom right is another clear checkpoint. Cyan sits beside the covered bays, but it should be separated from their unknown contents. Clear cyan when the lower bend is empty and the matching garage has an unobstructed approach. Once cyan is gone, the three large covers have more room to reveal their layers without immediately pushing cars into an occupied lane.
If the lower bend fills with two colors, use this recovery sequence:
- stop tapping both the lower-left shelves and the large covers;
- find the color whose leading car is farthest along the S-road;
- complete that color from the same shelf or exposed layer;
- wait until the bottom-right turn becomes empty;
- resume with the highest unfinished lower-left band.
Do not try to rescue the jam by opening a garage on the opposite side. Level 209 has only one continuous route, and another release merely joins the same queue.
Open The Three Covered Bays Without Mixing Layers
The three pale-purple bays in the bottom-right block are late-game reserves. Their markers indicate hidden stacks rather than three simple single-color groups. Open one bay, identify the color that appears, and check whether that color already occupies the road. If it does, complete the combined batch. If another color is active, leave the newly revealed cars parked until the road clears.
The late route checkpoints show the board resolving into strong color bands: cyan at the lower right, blue and purple near the upper shelves, green and dark red across the middle, red and purple at the lower left, and orange or yellow groups appearing as cleanup. This makes the final order easier to read than the opening. Work from the band closest to an empty road entrance, and do not reduce a second bay counter until the current layer has reached its garage.
Orange is particularly useful as a late connector color because a full orange row appears after several covers have changed. Clear it in one pass. Pink can then use the upper section, while green and yellow finish from their deeper bands. The final frames show the road still carrying one color at a time even though many rows are fully exposed; that traffic discipline is why the bottom covers do not trap the cleanup cars.
Three board checks make the finish reliable:
- Before opening a covered bay, the bottom-right turn should be clear.
- Before switching from a lower-left band to an upper band, the long central vertical segment should contain no car from the old color.
- Before the final yellow group, the upper-left counter area and the three middle shelves should already be empty or reduced to the matching cleanup color.
If a covered bay reveals a color different from the one you expected, do not force the written sequence. The safe rule is stronger than any fixed color list: finish the active road color, then choose the exposed layer with a direct garage path. The walkthrough's area order remains valid even when a counter reveal changes which of two late colors moves first.
Level 209 is controlled by the shape of its road. The upper hook must open before the middle shelves, the middle shelves must clear before the lower bend, and the lower bend must be free before the covered bays feed it. Following that geography turns a crowded board into clean horizontal batches. Tapping by proximity does the opposite, because cars from distant shelves meet on the same S-curve and consume every useful checkpoint at once.