Car Sort: Color Puzzle Level 211 Solution Walkthrough
Route Reference
Key opening, middle, and finish positions for this route.
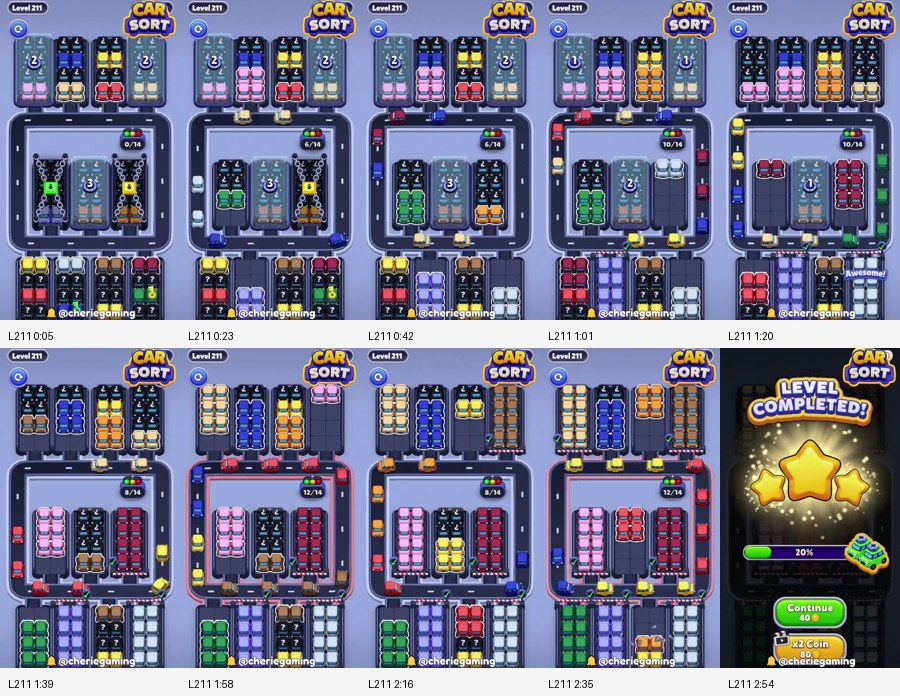
Three Center Columns Inside One Square Loop
Car Sort: Color Puzzle Level 211 surrounds three tall covered columns with a square road. Five garage stacks stand above the loop and five reserve columns stand below it. The top bank begins with pink, blue, yellow, red, pale-purple, and cream groups; the bottom bank hides additional red, green, purple, brown, and white layers. Inside the square, the left and right columns are chained while the middle counter conceals several layers.
The board is vertically symmetrical, but its traffic is not. The left and right road edges are the only ways for the top and bottom banks to exchange cars with the garages. If both sides fill with different colors, the three center columns cannot release anything. The opening should therefore use the short exposed cars around the top road, then reduce the side center columns before asking the bottom bank to feed the loop.
Recommended area order:
top pink/blue -> top yellow and red -> left center green -> right center orange -> middle counter layers -> bottom red/purple -> bottom green and white -> final cream, blue, orange, and red columns
Finish one color before starting the next. The counter values are checkpoints, not a reason to keep opening hidden cars. A safe board always has one empty vertical side of the square.
Open The Top Without Blocking Both Corners
Begin with the exposed top group closest to a free corner. Pink and blue are the practical first colors because they occupy short upper stacks and can enter the road before the center columns begin moving. Complete pink, let the top edge empty, and then move blue. Yellow and red follow from the remaining upper stacks.
Do not alternate individual cars from the top columns. A pink car waiting at the upper-left corner and a yellow car waiting at the upper-right corner can lock both sides even though the long lower road appears empty. Watch each batch reach its matching garage, then switch colors.
The upper phase is complete when:
- the first pink and blue stacks have shortened;
- yellow and red are no longer sharing the top edge;
- at least one upper corner is fully clear;
- no bottom counter has been opened merely to create more cars.
If a top car stalls, complete that same color from its visible column. Do not tap the chained center stack as a rescue move; every released center car uses the already blocked corner.
Clear The Side Columns Before The Middle Counter
The left center column reveals green as its first substantial batch. Green is safe after the upper-left road opens, and clearing it creates a full vertical channel beside the middle counter. The right center column later exposes orange or brown cars. Use it only after green has finished and the opposite side of the square is free.
The middle column should wait. Its layered counter is positioned directly between the side columns, so any car released from it depends on the space those columns create. Reduce one side, complete its color, then reveal one middle layer. If that layer matches a color already travelling, finish the combined group; otherwise, leave it parked until the loop clears.
The route reference shows the center changing in distinct stages. First, three dark columns dominate the square. Next, green fills the left column and orange appears on the right. Later, the side columns shrink and the middle counter becomes the main remaining obstruction. Near the late checkpoint, the center consists of clean pink, yellow, dark, and red bands rather than mixed hidden stacks.
Use this center rhythm:
- left column green;
- wait for the left road to empty;
- right column orange/brown;
- one middle layer;
- matching side or top remainder;
- next middle layer only after the active color clears.
The common error is reducing the middle counter while cars still occupy both vertical sides. That leaves the new layer trapped inside the square. Recover by stopping all counter taps and finishing the color nearest a corner. Once one side empties, complete its remaining center cars before returning to the counter.
Bring In The Bottom Bank In Controlled Pairs
The bottom five columns contain late traffic, even though some front cars are visible from the start. Red and purple are the first useful bottom colors because their columns align with the newly opened lower road. Move red as one group, wait for the bottom edge to clear, then take purple. Green and white should follow after the center has stopped releasing conflicting colors.
Some bottom columns are numbered covers. Open only the column whose mouth faces an empty section of road. If a layer changes from red to green, stop after red; do not expose green behind a red car still travelling. The board gives you generous vertical parking columns but only one horizontal route across the bottom.
At the late checkpoint, the upper bank has reorganized into tall cream, blue, orange, and dark-red groups while the bottom shows green, pale-purple, red, and white. These are cleanup columns. Choose the side with the empty corner and clear its complete color column. Cross to the opposite side only when the loop contains no car from the old batch.
If bottom red enters too early while center red is still covered, do not open more layers searching for a match. Finish visible red, clear the road, and return to the unfinished center checkpoint. The extra counter layers can wait; exposed road traffic cannot.
Final Board Checks And Recovery
The last phase should look orderly: the three center columns are mostly empty, the top and bottom banks show full single-color stacks, and the square road carries one batch at a time. Cream and blue often finish from the top-left side, orange and red from the top-right, while green, purple, and white clean up below.
Use these checks before each switch:
- Is the active color completely off the top or bottom edge?
- Is one vertical side of the square empty?
- Is the next stack a full visible color rather than a newly exposed unknown layer?
- Does its matching garage have a clear corner?
If the answer to any of these is no, keep working on the current batch. Most Level 211 jams are caused by changing color one move too early.
For a mixed-road recovery, identify the car farthest around the square and complete that color first. It has the shortest remaining route and will release a corner sooner. Then finish the second color before touching any cover. Once the road is empty, resume from the highest unfinished center layer or the nearest complete bottom column.
Level 211 is solved by preserving a vertical escape lane. The top groups establish it, the left and right center columns widen it, the middle counter spends it one layer at a time, and the bottom bank waits for a fully open square. Keep those phases separate and the final tall columns move directly to their garages without turning the loop into storage.