Car Sort: Color Puzzle Level 248 Solution Walkthrough
Route Reference
Key opening, middle, and finish positions for this route.
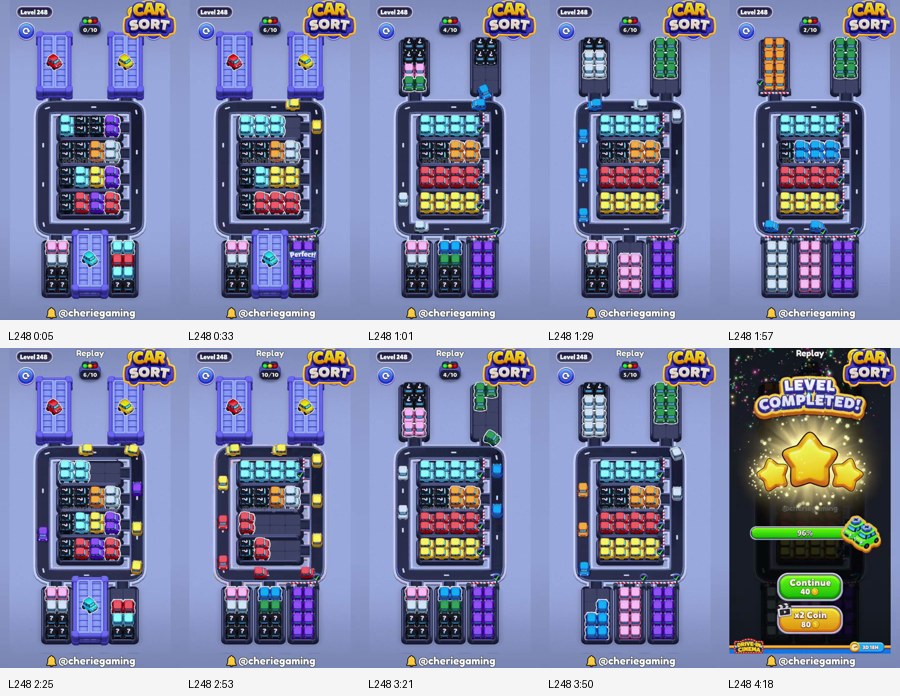
Why the rectangle is deceptive
The center begins as a stack of tightly packed bands. Cyan occupies much of the top row, orange sits below it, red fills a lower band, and yellow anchors the bottom. Dark cars and smaller white, blue, purple, pink, and green groups are distributed around or behind them. Only a few cars can reach the perimeter immediately.
The upper platforms show red and yellow cars, but those platforms are not convenient holding areas. Each has a single narrow connection to the loop. A car waiting at the wrong upper corner can interrupt the flow around the entire rectangle. At the bottom, three vertical gates add more colors later: blue on the left, pink in the middle, and purple on the right are visible in the developed board.
Level 248 uses a smaller active counter than the previous level. That makes partial colors especially expensive. Before tapping, identify a group that can actually reach completion from the exposed edges. A row may look uniform, yet some cars in it cannot leave until the neighboring band has shortened.
A practical color sequence
Use this order as the main route reference:
cyan → orange → red → yellow → white and green → blue → pink → purple → remaining dark cars
The first four colors correspond to the large horizontal bands and should dominate the opening. White and green depend on which upper lane becomes free first, so they can trade places. The bottom three colors belong to the later gate phase and should not be started while the central rectangle is still packed.
Cyan is the best opening target because the upper interior row has several cyan cars with a short route to the perimeter. Completing it reduces pressure along the top edge. Orange then receives a clear exit. Red should follow before yellow because the red band sits above the yellow band and obstructs its movement.
Yellow is a checkpoint rather than merely another color. When it disappears from the bottom interior row, the lower road becomes usable and the gated columns can feed cars without colliding with a central band.
Clearing the board from top to bottom
Begin at the upper-right and upper-left access points. Send cyan cars around the loop in the same direction and avoid alternating directions. Uniform traffic prevents two cars from meeting at a corner and consuming both sides of the road.
When most cyan cars have left, expose orange but do not immediately tap stray white or dark cars. The orange row can be completed with minimal counter use if handled as a single block. If an orange car reaches the lower-right corner, keep the bottom edge clear until its partners arrive.
Red becomes accessible next. The upper platform also contains a red car, but take it only when the interior red group is ready. Pulling that platform car too early creates an isolated red that circles the loop while cyan and orange still need the top connection. The platform is best used as the last piece of the red set.
For yellow, reverse the same logic. Most yellow cars begin near the bottom, while the upper yellow platform holds a useful finishing piece. Clear the interior yellow row first, then use the platform car to close the group. This timing prevents yellow from occupying the upper corner for half the level.
At the end of this phase, the center should show large empty horizontal spaces. If the rows are still mixed, you probably removed exposed cars by convenience rather than by color. Finish the most advanced band before touching a new one.
Upper platforms and side colors
White and green are the bridge between the central bands and the bottom gates. White cars emerge near the top access and can occupy a clean vertical lane. Green cars use the opposite side. Complete whichever color already has more visible cars, but keep them separate.
The replay's developed state shows a tidy white group at the top and a green group on the right while the central cyan, orange, red, and yellow bands remain organized. This is an important clue: the side colors should become complete columns, not loose cars distributed around the rectangle.
Dark cars may be exposed during this process. Leave them in place unless a full dark set is available. They frequently sit in positions that look like blockers, but moving one dark car prematurely merely transfers the blocker to the road. Open space behind a car is useful only when the moved car has somewhere productive to go.
Timing the three bottom gates
Do not open all three bottom columns together. Start with the gate whose visible color matches a group already on the board. Blue is commonly the first useful gate color because blue cars appear along the loop after the central rows shrink. Pull the blue column only when those cars can combine immediately.
Pink follows once the middle lower connection is unobstructed. Its column sits directly under the central road, so a waiting pink car can seal the most valuable entrance. Move pink as a complete sequence. If you have only two visible pink cars, postpone the gate and finish white or green first.
Purple occupies the right lower column. It should be late because its approach shares the corner used by several earlier colors. After blue and pink are complete, purple has a direct path and is much less likely to become stranded.
Each gate release should make the board simpler. If opening a gate increases the number of active colors, that release was early. Stop, complete one existing color, and only then return to the newly exposed column.
Handling the replay transition
The source video switches to a replay during the second half. Use the visible counters and major row shapes as checkpoints rather than trying to mirror the exact second. A useful first checkpoint is the center showing four clean bands with cyan above orange, red, and yellow. A second is white and green forming separate top-side groups. A third is the bottom displaying blue, pink, and purple as complete or nearly complete columns.
If your colors appear in a different physical slot, that is not automatically a mistake. The game can place a completed group in any available garage. What matters is that the road remains open and that each counter slot contributes to a group that can finish.
Recovery from common failures
If the loop is blocked at an upper corner, check whether the waiting car belongs to red or yellow from a platform. Complete that color using the central row. Do not send another platform car into the same corner.
If the bottom edge is jammed, stop opening gates. Finish yellow or whichever lower central band remains. That restores the horizontal connection across the base of the rectangle.
If the counter holds too many colors, count exposed partners. Prioritize the color with enough reachable cars to fill its group without uncovering a new gate. Two visible partners behind a movable row are safer than two hypothetical partners inside a closed column.
If blue, pink, and purple are all active together, finish the color whose column is closest to full. Avoid taking cars from a second bottom column while the first still has an incomplete group on the road.
If you need to restart, remember the four-phase rhythm: clear cyan and orange from the top half; remove red and yellow from the lower half; consolidate white and green at the sides; then release blue, pink, and purple one gate at a time. That rhythm solves the traffic problem before the hidden colors can complicate it.
The Level 248 solution is built on perimeter discipline. Large center rows should leave in coherent color blocks, upper platform cars should serve as finishing pieces, and the three lower gates should be treated as separate tasks. Preserve one clear corner, and the compact rectangle becomes predictable rather than crowded.