Car Sort: Color Puzzle Level 325 Solution Walkthrough
Route Reference
Key opening, middle, and finish positions for this route.
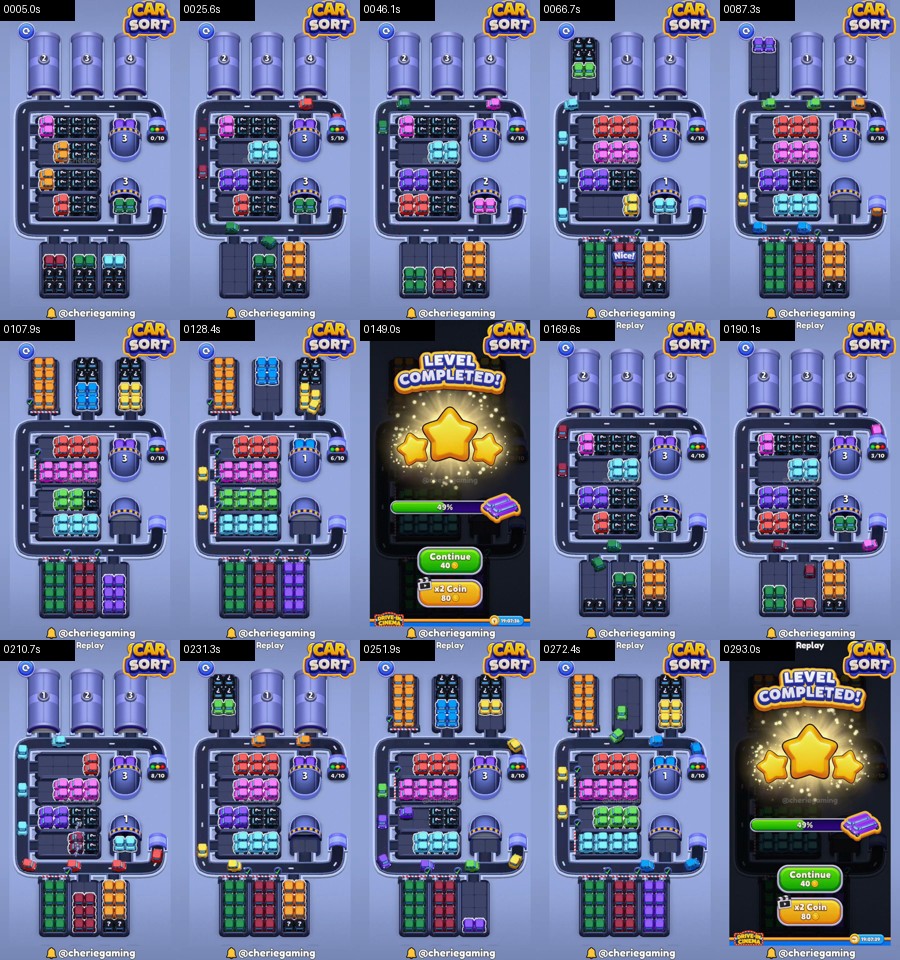
The square loop is the only buffer
The opening shelves show pink, pale cyan, purple, and red around several dark covered spaces. Those four colors should be handled shelf by shelf. The loop can hold a small amount of traffic, but it cannot safely store fragments from several colors while the numbered garages are still closed.
A reliable route reference is:
pink upper-left → pale cyan middle → purple lower-middle → red lower shelf → first green release → orange reserve → upper black/blue/yellow exits → second red and pink wave → green and cyan cleanup
The order is longer than the opening board suggests because the bottom reserves and top exits introduce new groups. Use each numbered garage as a checkpoint: finish the color currently feeding it, wait for the gate animation, and only then start the next shelf.
What each numbered garage controls
The round garages marked 1, 2, 3, and 4 are not interchangeable destinations. Their visible numbers indicate how many matching deliveries remain before that part of the board changes. The lower-right garage is the first practical target because the opening shelves can feed it without using a covered reserve. The larger upper-right circle remains relevant for longer and controls the later tower wave.
Check the board after every counter change. A cleared upper shelf should reveal a single new color face, while the lower covers should remain shut during the pink-and-cyan opening. If a bottom column opens while the square is still carrying two colors, wait; the new reserve is available but not yet safe.
Clear the four opening shelf colors
Begin with pink from the upper-left shelf. It reaches the road without crossing another active group and exposes more of the pale-cyan lane. Finish the connected pink cars before touching the red shelf at the bottom.
Pale cyan is next. Move it through the top and left sides of the square until its visible batch is gone. Cyan creates the first useful empty strip inside the shelf block, which gives purple a cleaner turn.
Clear purple from the lower-middle shelf, then red from the bottom shelf. This pair should not be reversed. Purple needs the space released by cyan, while red needs both the purple shelf and the lower road edge to be clear. When the red batch completes, the lower covers begin to reveal the tall reserves.
Confirm the first board reset
After the opening four batches, the center-left shelves should look much less dense and the road along the bottom should be empty. This is the first reset point. If a pink or cyan car is still circling, finish it before touching green below. The replay reaches the reserve phase with no mixed queue stored on the loop, which is why the much taller orange column can enter safely.
Release the lower reserves without flooding the loop
Green appears first in the lower section. Take the complete exposed green column and let it clear before opening orange. The orange reserve is tall and can put several cars onto the road quickly; moving it while green is still circling is the most common way to fill the bottom edge.
Once orange is complete, the upper exits become the main focus. The replay shows dark cars, blue, and yellow occupying the tall top bays. Treat these as separate batches even though they share the same approach. Clear the dark group, then blue, then yellow as each exit becomes active. Do not alternate colors between the tall bays.
Reading the upper-exit transition
The top of the board changes more dramatically than the lower shelves. A covered bay can become a full vertical column after one counter falls. Look at the face nearest the road rather than the colors still visible at the far end of the tower. The nearest complete face is the next batch; deeper colors are only a preview.
Dark cars should leave while both top corners are open. Blue can then use the left side of the square, and yellow gets the clean final pass along the right. If yellow starts before blue finishes, their markers alternate around the top edge and neither garage receives a full group quickly enough.
The board may now resemble the opening again, but the shelf contents have changed. A second red and pink wave becomes available, followed by more green and pale cyan. These are not leftovers from careless play; they are deeper layers released by the counters.
Finish the replay layers
Use the same discipline for the second wave. Complete red while the lower edge is empty, then pink across the middle. Green follows once pink uncovers the center shelves. Pale cyan is the safest late batch because the square loop is almost clear and the remaining garage has a direct approach.
The final cyan group is a useful completion check. By the time it moves, the three bottom reserves should be empty and the tall exits should show no covered faces. If another red or green stack is still visible, finish that stack first; late cyan is intended to be a direct cleanup batch, not a color used to make temporary room.
If your state differs from the route reference, stop adding cars and inspect the numbered circles. A garage still showing 3 means its matching shelf has not been fully served. A blocked bottom edge usually means green and orange were mixed. A crowded top bend means black, blue, or yellow was started before the previous tall exit completed. Finish the color already closest to its garage instead of opening another reserve.
For a one-car mistake, follow the active counter rather than restarting. A stranded green car can usually be rescued by completing the exposed lower green column; an orange car can be cleared by committing to the entire orange reserve. Restart only if two partial tower colors occupy opposite corners and the center shelves still contain an unfinished batch, because that state removes the square loop's last passing cell.
Level 325 is solved by treating every counter change as a boundary between phases. The opening four colors empty the shelves, green and orange unlock the reserves, the top exits clear in distinct batches, and the second shelf wave finishes only after the square loop has regained its buffer space.